Low water pressure in the kitchen sink can be frustrating. Washing dishes takes longer. Filling pots is slow. But don’t worry! You can fix it yourself. Let’s learn how to increase water pressure in your kitchen sink.

Credit: waypointinspection.com
Common Causes of Low Water Pressure
First, it’s important to know why the water pressure is low. Here are some common causes:
- Clogged Aerator
- Blocked Cartridge
- Water Leaks
- Closed Shutoff Valves
- Main Water Supply Issues
Clogged Aerator
The aerator is at the end of the faucet. It mixes air with water. Over time, it can get clogged with debris. This reduces water flow.
Blocked Cartridge
The cartridge is inside the faucet. It controls water flow and temperature. If it’s blocked, water pressure decreases.
Water Leaks
Leaks in the pipes reduce water pressure. Check for any signs of water leaks.
Closed Shutoff Valves
Shutoff valves control water flow to the sink. If they are not fully open, water pressure will be low.
Main Water Supply Issues
Sometimes the problem is with the main water supply. This could be due to issues with the city’s water supply.
Steps to Increase Water Pressure
Now let’s look at steps to increase water pressure. Follow these simple steps to improve water flow.
Step 1: Clean The Aerator
Cleaning the aerator is easy. Here is how you do it:
- Turn off the water supply.
- Unscrew the aerator from the faucet.
- Soak it in vinegar for 30 minutes.
- Scrub it with a brush to remove debris.
- Reattach the aerator to the faucet.
- Turn the water supply back on.
Step 2: Check The Cartridge
If cleaning the aerator doesn’t work, check the cartridge. Here is how:
- Turn off the water supply.
- Remove the faucet handle.
- Take out the cartridge.
- Check for any blockages or debris.
- Clean or replace the cartridge if needed.
- Reassemble the faucet.
- Turn the water supply back on.
Step 3: Inspect For Water Leaks
Check for any signs of water leaks. Look under the sink and around the pipes. If you find a leak, call a plumber to fix it.
Step 4: Open Shutoff Valves
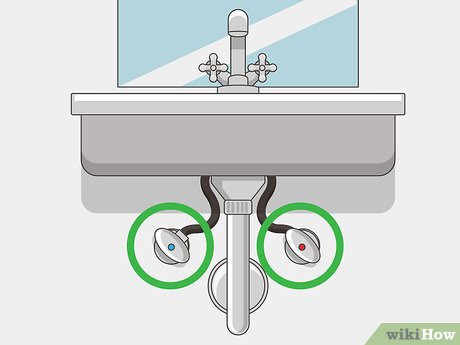
Make sure the shutoff valves are fully open. They are usually under the sink. Turn them counterclockwise to open them fully.
Step 5: Check Main Water Supply
If the problem persists, check the main water supply. Contact your local water company. They can check for any issues with the supply.

Credit: www.wikihow.com
Prevent Future Low Water Pressure
It’s also important to prevent future issues. Here are some tips:
- Regularly clean the aerator.
- Inspect the cartridge every few months.
- Check for leaks regularly.
- Ensure shutoff valves are always fully open.
- Monitor the main water supply pressure.
Frequently Asked Questions
How Can I Fix Low Water Pressure In My Kitchen Sink?
Check for clogged aerators or pipes. Clean or replace them. Ensure shut-off valves are fully open.
What Causes Low Water Pressure In The Kitchen Sink?
Common causes include clogged aerators, blocked pipes, or partially closed shut-off valves.
How Do I Check My Kitchen Sink Aerator?
Unscrew the aerator from the faucet. Inspect and clean it. Replace if necessary.
Can A Clogged Pipe Cause Low Water Pressure?
Yes, a clogged pipe can restrict water flow, leading to low pressure.
Conclusion
Low water pressure in the kitchen sink is annoying. But you can fix it. Clean the aerator, check the cartridge, and inspect for leaks. Ensure shutoff valves are fully open. If needed, check the main water supply. Follow these steps to increase water pressure in your kitchen sink. Your kitchen tasks will become easier and faster. Happy fixing!


Leave a Reply