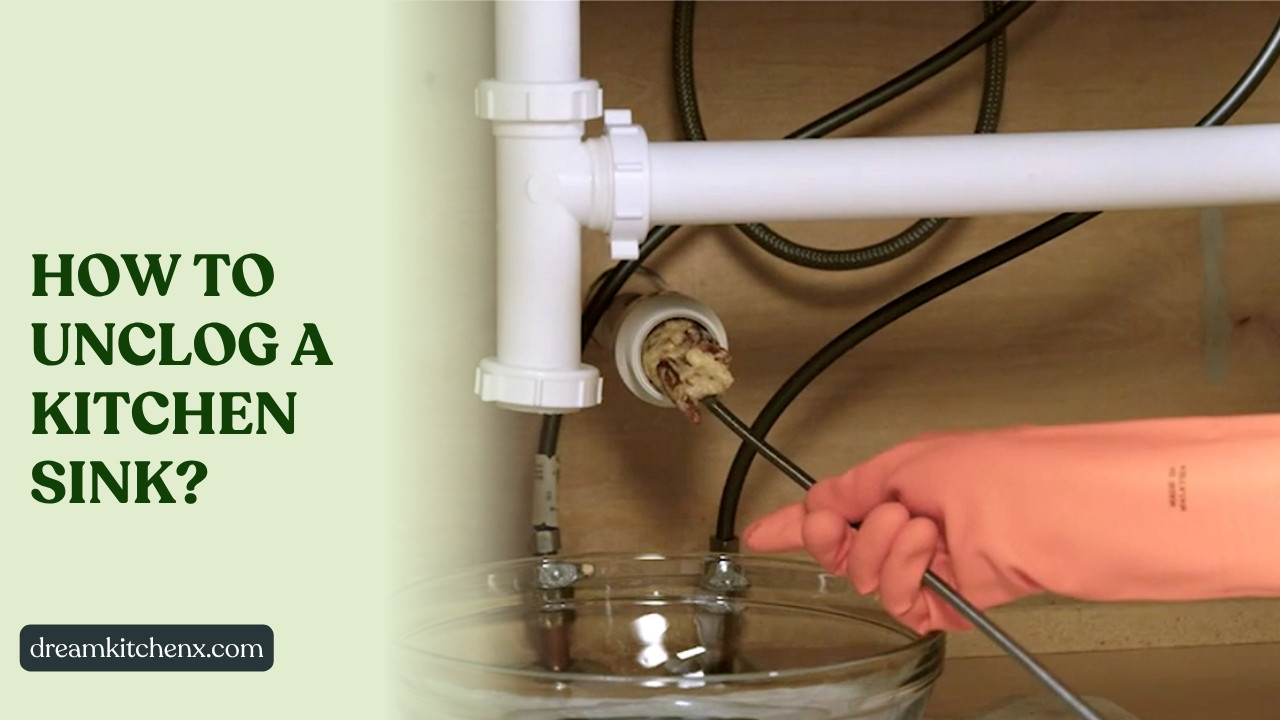
You can unclog a kitchen sink quickly using simple DIY methods like boiling water, baking soda and vinegar, or a plunger. For tougher clogs, try clearing the P-trap or using a drain snake. Most common sink blockages are solvable with tools you likely already have.
A clogged kitchen sink is a common and frustrating household problem. It stops dishwashing, makes food prep tricky, and can even cause unpleasant odors. Whether it’s slow draining or completely blocked, a clogged sink can really disrupt your routine. But don’t worry—you’re in the right place! This guide will walk you through easy, practical solutions to get your kitchen sink flowing freely again, often with items already in your home. Let’s dive into simple fixes and more advanced methods to tackle any clog.
Before You Start: Safety and Preparation
Before you begin tackling that stubborn clog, a little preparation goes a long way. This ensures your safety and makes the unclogging process smoother.
First, try to figure out what kind of clog you have. Is your sink draining slowly, or is it completely blocked with standing water? Knowing this can help you pick the best method.
Safety is key! Always protect yourself. Wear rubber gloves to keep your hands clean and safe from grime or harsh chemicals. If you plan to use any chemical drain cleaners, make sure you have good ventilation. Open windows and doors, and consider wearing safety glasses to protect your eyes from splashes. You can learn more about general household safety from resources like the Occupational Safety and Health Administration (OSHA).
Next, gather your tools. Having everything ready saves time and frustration. Here’s a list of common tools you might need:
- Plunger: A basic but powerful tool for many clogs.
- Bucket: To catch any water or debris when you open pipes.
- Old towels or rags: For spills and cleanup.
- Screwdriver or pliers: Needed if you have to remove the P-trap.
- Flashlight: To see inside the drain if needed.
Finally, take some initial steps. If there’s standing water in your sink, use a small cup or bowl to carefully scoop out as much as you can. Pour it into another sink that’s draining well or a bucket. Then, clear away any visible food scraps, hair, or debris from the drain opening. This gives you a clear path to the clog.
Easy DIY Methods to Unclog Your Kitchen Sink
Now that you’re prepared, let’s start with some simple, effective DIY methods. These often work for most common kitchen sink clogs and don’t require special tools.
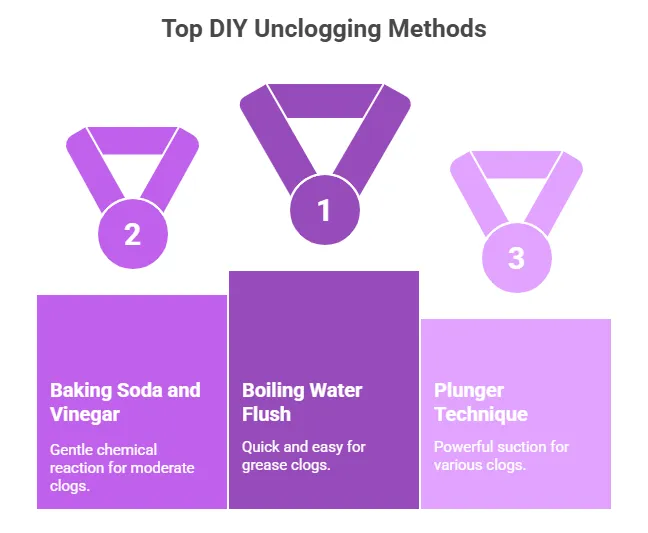
A. The Boiling Water Flush
This is often the first and easiest thing to try, especially for grease clogs. Hot water can dissolve grease and soap residue that builds up in your pipes.
Steps:
- Boil a kettle or pot full of water.
- Carefully pour the boiling water slowly down the drain in two or three stages. Wait a few seconds between each pour. This gives the hot water time to work on the clog.
- After pouring all the water, wait about 10-15 minutes. Then, turn on your faucet to see if the water drains freely.
When it works best: This method is ideal for minor clogs caused by fats, oils, and grease.
B. Baking Soda and Vinegar Method
This classic home remedy uses a gentle chemical reaction to break down clogs. It’s safe for most pipes and the environment.
Steps:
- Pour about half a cup to a full cup of baking soda down the drain. Try to get as much as possible directly into the drain opening.
- Follow it immediately with an equal amount of white vinegar (half to a full cup). You’ll likely see fizzing and bubbling—that’s the reaction working!
- Quickly cover the drain with a stopper or a plate. This helps direct the reaction downwards into the clog.
- Let it sit for at least 30 minutes, or even better, overnight.
- After the waiting period, flush the drain with hot tap water (or boiling water, if the clog is still stubborn).
When it works best: This method is effective for moderate clogs and can also help freshen up a smelly drain.
C. The Plunger Technique
A basic plunger is a powerful tool for dislodging many types of clogs by creating suction.
Steps:
- If there’s no standing water, fill the sink with enough hot water to cover the bottom of the plunger cup. This helps create a good seal.
- Place the plunger firmly over the drain opening, making sure it creates a tight seal.
- Pump the plunger vigorously up and down 10-20 times. Keep the seal tight.
- On the last pump, pull the plunger up sharply to break the suction.
- Check if the water drains. If not, repeat the process a few more times.
Tips for effectiveness:
- For a double kitchen sink, block off the second drain opening tightly with a stopper or a wet rag. This helps create better suction on the clogged side.
- Ensure the plunger completely covers the drain opening to create a vacuum.
When it works best: The plunger is highly effective for most common clogs, especially those caused by food debris.
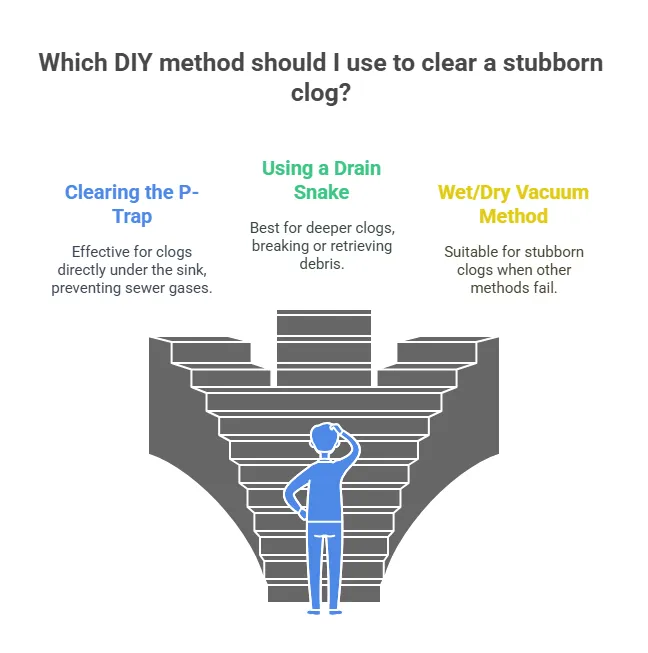
More Advanced DIY Solutions for Stubborn Clogs
If the easy methods didn’t work, don’t give up! These next solutions require a bit more effort but can tackle tougher, deeper clogs. For complex plumbing information, resources like the Environmental Protection Agency (EPA) offer insights into water systems and efficient plumbing.
A. Clearing the P-Trap (U-Bend)
The P-trap (also called a U-bend trap) is the curved pipe directly under your sink. It’s designed to hold a small amount of water to prevent sewer gases from entering your home. Because of its shape, it’s also a common spot for clogs to collect.
Steps:
- Safety First: Place a bucket directly underneath the P-trap. This will catch any water and debris that will come out.
- Using a pair of pliers or a wrench, carefully loosen the large slip nuts on both ends of the P-trap. These nuts hold the trap to the drainpipe and the wall pipe. You might need to turn them counter-clockwise.
- Once the nuts are loose, carefully remove the P-trap. Water will likely drain into your bucket.
- Inspect the inside of the P-trap. You’ll likely find the clog here, often a slimy mixture of food, grease, and sometimes even small objects.
- Use an old brush, a wire, or even your gloved finger to clear out all the debris. You can rinse the trap in another sink or outside with a hose.
- Once clean, carefully reassemble the P-trap, making sure the slip nuts are tightened firmly (but don’t overtighten, as this can crack plastic pipes).
- Turn on the water slowly to check for leaks and ensure the drain is clear.
When it works best: This method is highly effective when the clog is located directly in the P-trap, which is very common.
B. Using a Drain Snake (Plumber’s Snake/Auger)
A drain snake is a long, flexible tool that can reach deeper into your pipes to break apart or retrieve clogs. You can usually rent or buy one at a hardware store. For more detailed plumbing advice, you can often find helpful guides from professional organizations like the Plumbing-Heating-Cooling Contractors Association (PHCC).
Steps:
- Prepare: If you haven’t already, remove the P-trap (as described above) to get direct access to the drainpipe leading into the wall.
- Insert the Snake: Feed the end of the drain snake into the open drainpipe. Push it gently until you feel resistance.
- Break Up or Retrieve: Once you hit the clog, tighten the screw on the snake’s handle to lock the cable in place. Now, crank the handle (usually clockwise) while pushing forward. This action helps the snake’s tip break up the clog or grab onto it.
- Retrieve the Clog: Slowly pull the snake back out of the pipe. You might pull out parts of the clog, like hair or food debris.
- Flush: Once you believe the clog is clear, run hot water down the drain to flush away any remaining debris.
Types of snakes:
- Handheld snakes: Smaller, good for sink drains.
- Larger augers: Used for tougher clogs deeper in the main drain lines.
Safety & Tips:
- Never force the snake. If it gets stuck, gently pull back and try again.
- Always wear gloves, as the snake will be dirty.
When it works best: A drain snake is excellent for deeper clogs that are out of reach of simpler methods, especially those caused by hair or compacted food debris.
C. The Wet/Dry Vacuum Method
While less common for kitchen sinks, a powerful wet/dry vacuum can sometimes create enough suction to pull a clog free. This method works by creating a powerful vacuum seal over the drain.
Steps:
- Prepare the Vacuum: Remove any filters from your wet/dry vacuum that aren’t meant for wet use. Make sure the vacuum is set to “wet” mode if it has one.
- Create a Seal: Use an old towel or rag to create a tight seal between the vacuum hose and the drain opening. You might need to hold it firmly in place. For a double sink, block the second drain with a stopper or wet rag.
- Turn On: Turn on the wet/dry vacuum to its highest suction setting.
- Monitor: Listen for the sound of the clog being dislodged. The vacuum might pull the clog directly into its tank.
- Check: After a minute or two, turn off the vacuum and remove the seal. Run water down the drain to see if the clog is gone.
When it works best: This method can be a surprising solution for very stubborn clogs when other methods have failed, especially if the clog is somewhat loose but just won’t budge.
When to Use Chemical Drain Cleaners (and Cautions)
Chemical drain cleaners are powerful products designed to dissolve or liquefy clogs. They can be tempting to use because they seem so easy, but it’s important to understand how they work and, more importantly, their risks.
These cleaners contain strong chemicals that react with the clog material. Some create heat to melt grease, while others use strong acids or bases to break down organic matter like hair and food.
Types of Chemical Drain Cleaners:
- Liquid/Gel: These are usually thicker and designed to sink through standing water to reach the clog.
- Granules/Powders: These are poured into the drain and then activated by hot water.
Strong Cautions:
- Follow instructions exactly: Read the product label carefully and never guess.
- Ventilation, gloves, eye protection: Always ensure good airflow in your kitchen, wear rubber gloves, and protect your eyes with safety glasses to prevent chemical splashes. The American Chemical Society offers good general guidelines for chemical safety.
- Never mix different cleaners: Combining different chemical drain cleaners can create dangerous fumes or even explosions. If one type doesn’t work, do not try another right away.
- Can damage pipes over time: Repeated use of harsh chemicals can corrode or weaken certain types of pipes, especially older ones.
- Not for all pipes: Some chemicals are not safe for PVC pipes or older metal pipes. Check the product label to ensure it’s compatible with your plumbing.
- Environmental impact: These chemicals can be harmful to waterways if not properly managed.
Recommendation: Chemical drain cleaners should generally be a last resort among DIY options. If simpler, safer methods don’t work, consider calling a professional plumber before reaching for harsh chemicals.
Troubleshooting Common Issues
Sometimes, a clogged kitchen sink comes with its own set of confusing problems. Here’s how to troubleshoot a few common scenarios.
- Double Kitchen Sink Clog: If both sides of your double sink are clogged, it usually means the blockage is deeper down in the main drain line that both sinks share. When plunging, make sure to block off the non-clogged side tightly with a stopper or a wet rag to get good suction on the clogged side. If plunging doesn’t work, you’ll likely need to access the P-trap or use a drain snake from the shared drain.
- Garbage Disposal Clogs: If your sink with a garbage disposal is clogged, the disposal itself might be the problem.
- Reset Button: Look for a small red or black reset button on the bottom of the disposal unit. Press it firmly.
- Check for Foreign Objects: Turn off the power to the disposal at the circuit breaker. Use a flashlight to look inside the disposal. Carefully remove any visible foreign objects (like silverware or bones) with pliers or tongs—never your hand!
- Use an Allen Wrench: Many disposals come with a small Allen wrench. There’s a hexagonal hole in the center of the bottom of the disposal. Insert the wrench and turn it back and forth to manually free the impellers (grinding plates).
- Slow Draining vs. Completely Blocked: A slow-draining sink often indicates an early stage clog that’s building up. This is a great time to try boiling water or the baking soda and vinegar method. A completely blocked sink means the clog is more severe, and you might need to use a plunger, clean the P-trap, or use a drain snake.
- Still Clogged After Trying Everything: If you’ve tried all the DIY methods mentioned and your sink is still clogged, it’s a strong sign that the blockage is too tough or too deep for you to handle. At this point, it’s time to consider calling a professional.
Preventing Future Kitchen Sink Clogs

The best way to deal with a clogged sink is to prevent it from happening in the first place! A little effort in daily habits can save you a lot of frustration and money.
Don’t Pour Grease Down the Drain: This is the #1 rule! Fats, oils, and grease (FOG) solidify when they cool, sticking to your pipes and trapping other debris. Instead, pour cooled grease into an old container (like a coffee can or glass jar) and dispose of it in the trash once solidified. For more information on FOG and plumbing, utility companies often provide great resources, such as those from local water treatment facilities.
Use a Drain Strainer: Place a drain strainer (a mesh or perforated cover) over your sink drain. This simple device catches food particles, coffee grounds, and other debris before they go down the drain and cause a clog. Clean it out regularly.
Regular Flushing: Even without a visible clog, regular maintenance can help.
- Hot Water: After washing dishes, let hot water run for a minute or two to flush away any residual grease.
- Baking Soda & Vinegar (Monthly): Once a month, pour half a cup of baking soda down the drain, followed by half a cup of white vinegar. Let it sit for 15-30 minutes, then flush with hot water. This helps keep the drain fresh and clear minor buildup.
Be Mindful of Garbage Disposal Use: While convenient, disposals aren’t magic. Avoid putting certain items down them:
- Coffee Grounds: They clump together and don’t break down well.
- Eggshells: The membrane can stick to pipes.
- Fibrous Foods: Celery, potato peels, banana peels, and corn husks can tangle and create blockages.
- Pasta and Rice: They expand with water.
- Fruit Pits and Bones: Too hard for most disposals. Always run cold water before, during, and for about 30 seconds after using the disposal to help flush waste away.
Periodic Maintenance: Consider having a professional plumber perform periodic drain cleaning, especially if you have older pipes or a history of frequent clogs. They can clear out buildup that DIY methods can’t reach.
When to Call a Professional Plumber
While many kitchen sink clogs can be fixed with DIY methods, sometimes the problem is bigger than you can handle. Knowing when to call a professional plumber can save you time, further damage, and frustration.
Here are clear signs it’s time to pick up the phone:
- Persistent Clogs: You’ve tried multiple DIY methods, and the clog keeps coming back or simply won’t budge. This suggests a more serious or deep-seated issue.
- Multiple Drains Clogged: If not just your kitchen sink, but also your bathroom sink, shower, or toilet are backing up, it’s a strong indicator of a blockage in your main sewer line, not just a single fixture. This is a job for a professional.
- Sewage Smell: If you notice a strong, unpleasant sewage smell coming from your drains, it can be a sign of a significant blockage, an issue with your vent pipes, or even a sewer line problem.
- Water Backing Up in Other Fixtures: For example, if you flush the toilet and water backs up in your kitchen sink, or if using your washing machine causes water to come up into the sink, it’s a clear sign of a main line blockage.
- You’re Uncomfortable with DIY: If you feel overwhelmed, unsure, or unsafe trying to fix the clog yourself, there’s no shame in calling in an expert. Plumbing can be complex, and it’s always better to prioritize your safety and prevent damage to your home. Professional organizations like the National Association of Home Builders (NAHB) often provide resources related to professional home maintenance.
A professional plumber has specialized tools and expertise to quickly identify and clear even the most stubborn or complex clogs, ensuring your plumbing system is functioning correctly and safely.
Conclusion
A clogged kitchen sink is undoubtedly a nuisance, but as you’ve seen, most blockages are entirely manageable with some basic tools and a bit of know-how. From simple boiling water flushes to tackling the P-trap or using a drain snake, you now have a comprehensive guide to troubleshoot and resolve common kitchen sink clogs.
Remember that prevention is key; by being mindful of what goes down your drain and performing regular maintenance, you can significantly reduce the chances of future clogs. If, despite your best efforts, the clog remains or multiple drains are affected, don’t hesitate to call a professional plumber. Your efforts empower you to keep your kitchen running smoothly, ensuring a happier and more functional home.


Leave a Reply