
Quick Summary: Freezing peaches in vacuum bags is an effortless way to preserve their fresh taste and texture for future use. This method removes air, preventing freezer burn and extending shelf life significantly, offering a simple, long-lasting solution for enjoying summer peaches year-round.
Summer’s bounty of juicy peaches is a true delight, isn’t it? But what happens when you have more than you can enjoy fresh? Letting them go to waste is a kitchen crime! Many home cooks struggle with preserving these tender fruits, ending up with mushy messes or flavorless chunks after freezing. It can feel like a lost cause. But what if I told you there’s a simple, effective way to keep your peaches tasting like they just came off the tree? We’re talking about using the magic of vacuum sealing. It’s surprisingly easy and makes all the difference. Let’s dive into how freezing peaches in vacuum bags can become your go-to storage secret, ensuring you have delicious peaches all year long with minimal fuss.
Why Vacuum Sealing is a Game-Changer for Freezing Peaches
You’ve probably tried freezing fruits before, maybe in regular freezer bags or containers. If you’ve encountered that icy, unappetizing layer of freezer burn, you know the frustration. This happens because air trapped in the packaging comes into contact with the food, causing moisture to evaporate and form ice crystals. It’s a common problem that instantly diminishes the quality of your produce.
Vacuum sealing tackles this head-on. By removing almost all the air from the bag before sealing, it creates an airtight barrier. This protective seal is crucial for:
- Preventing Freezer Burn: Drastically reduces exposure to air, the main culprit behind freezer burn.
- Maintaining Texture and Flavor: Keeps peaches firmer and their natural sweetness intact, closer to their fresh state.
- Extending Shelf Life: Properly sealed peaches can last up to 2-3 years in the freezer, significantly longer than traditional methods.
- Saving Space: Vacuum-sealed bags are often more compact and stackable, making freezer organization a breeze.
Think of it as giving your peaches their own personal, protective bubble, shielding them from the harsh freezer environment. It’s a technique that professional chefs and serious home preservers swear by, and it’s surprisingly accessible for anyone with a vacuum sealer.
Essential Tools for Freezing Peaches in Vacuum Bags
Before we get our hands on those delicious peaches, let’s gather our tools. You don’t need a professional kitchen setup for this; most of these items are standard in a well-equipped home kitchen.
The Must-Haves:
- Vacuum Sealer: This is your key piece of equipment. There are many models available, from countertop units to handheld ones. Look for a model that suits your budget and how often you plan to use it. Some even have a “moist” setting, which is helpful for juicy fruits like peaches. Brands like FoodSaver and Anova Culinary (known for sous vide but also offering vacuum sealers) are popular choices for home use.
- Vacuum Sealer Bags or Rolls: You’ll need bags specifically designed for your vacuum sealer. These are typically BPA-free and durable to withstand freezing temperatures. You can buy pre-made bags or rolls of plastic material that you cut to size and seal yourself, offering more flexibility.
- Sharp Knife: For slicing and preparing the peaches.
- Cutting Board: A stable surface for slicing.
- Large Mixing Bowl: For tossing peaches with any optional additives.
- Baking Sheet or Tray: To freeze peach slices individually before bagging.
- Freezable Fruit Protector (Optional): Such as ascorbic acid (Vitamin C) powder or citric acid, to help prevent browning.
Helpful Extras:
- Measuring Spoons: For accurate measurement of fruit protectors.
- Spatula: For gently tossing the peaches.
- Labels and Marker: For dating and identifying your frozen peaches.
Having these items ready will make the process smooth and efficient. Don’t worry if you don’t have a fruit protector; we’ll cover alternative methods.
Step-by-Step Guide: Freezing Peaches in Vacuum Bags
Ready to turn your ripe peaches into a long-lasting treasure? Follow these simple steps for perfectly vacuum-sealed peaches.
Step 1: Select and Prepare Your Peaches
Start with ripe, but not overly soft, peaches. For the best results, choose freestone varieties, as they are easier to pit. Wash the peaches thoroughly under cool running water. Gently pat them dry with a clean towel.
Step 2: Pit and Slice the Peaches
Slice the peaches in half, twist them apart, and remove the pit. You can choose to peel the peaches or leave the skins on. For slicing, aim for wedges or half-moons about 1/2 inch thick. Uniformity in size ensures they freeze and thaw evenly.
Step 3: Prevent Browning (Optional but Recommended)
Peaches are prone to browning once cut due to oxidation. To combat this:
- Ascorbic Acid (Vitamin C): Dissolve 1 teaspoon of ascorbic acid powder in 2 tablespoons of cool water. Gently toss the peach slices in this solution for a minute or two. Drain well.
- Citric Acid: Similar to ascorbic acid, dissolve 1 teaspoon of citric acid in 2 tablespoons of water and toss.
- Lemon Juice: A common household alternative. Toss peach slices with about 2 tablespoons of lemon juice per quart of fruit. Note that lemon juice can slightly alter the flavor.
- Sugar Pack: You can also toss the peach slices in sugar (about 1/2 cup per quart of fruit) or a light syrup (made from 1 cup sugar to 1 cup water, then cooled). This not only helps prevent browning but also adds sweetness.
If you skip this step, don’t worry too much. The vacuum sealing will still offer significant protection, but you might notice slight cosmetic browning on the surface. For more food preservation tips, the National Center for Home Food Preservation (NCHFP) at the University of Georgia offers excellent, research-based guidance.
Step 4: Pre-Freeze the Peach Slices
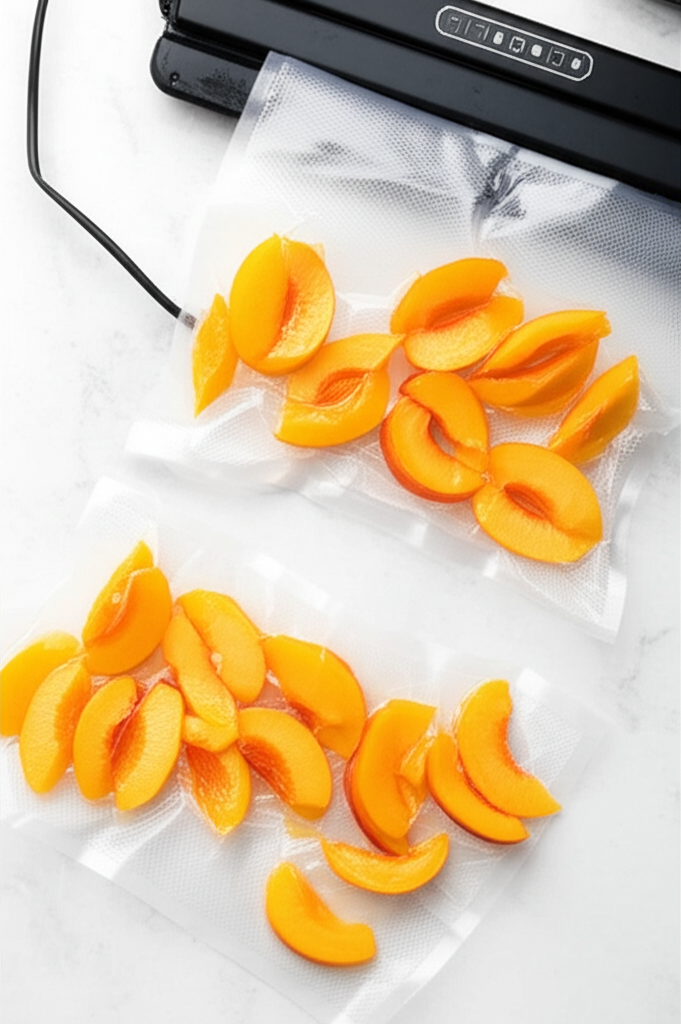
This is a crucial step for maintaining texture. Spread the prepared peach slices in a single layer on a baking sheet or tray. Make sure they aren’t touching each other. Place the tray in the freezer for 1-2 hours, or until the slices are firm but not solid. This prevents them from clumping together in the vacuum-sealed bag.
Step 5: Vacuum Seal the Peaches
Once the peach slices are individually frozen, remove the tray from the freezer. Spoon the firm peach slices into your vacuum sealer bags or cut rolls to the desired size. Important: If you used sugar or syrup in Step 3, be cautious not to get too much of it into the sealing channel of your machine, as it can interfere with the seal. For very juicy items or those packed in liquid, you might place them in a smaller, heat-sealed bag first, then put that inside the vacuum-sealable bag, or use a vacuum sealer with a “moist” setting and a drip tray.
Place the open end of the bag into the vacuum sealer according to your machine’s instructions. Select the appropriate setting (e.g., “sealing,” “moist,” or “vacuum & seal”). The machine will remove the air and then create a strong heat seal. If using rolls, seal one end before filling, then seal the other end after vacuuming.
Step 6: Label and Freeze
Once sealed, carefully remove the bag from the vacuum sealer. Write the date and contents (e.g., “Peaches – Aug 2023”) on the bag with a permanent marker. This helps you track your inventory. You can then stack the bags flat in your freezer or arrange them upright for easier access.
Pros and Cons of Vacuum Sealing Peaches
As with any kitchen technique, vacuum sealing has its advantages and disadvantages. Understanding these can help you decide if it’s the right method for your needs.
| Pros | Cons |
|---|---|
| Excellent Quality Preservation: Dramatically reduces freezer burn, maintaining flavor and texture over extended periods. | Initial Investment: Requires purchasing a vacuum sealer machine, which can range from $50 to over $300. |
| Extended Shelf Life: Peaches can remain high quality for up to 2-3 years. | Bag Cost: While reusable, vacuum sealer bags or rolls are an ongoing expense. |
| Space Saving: Compact bags stack efficiently in the freezer, optimizing storage space. | Potential for Bag Damage: Sharp peach pits or edges could potentially puncture bags if not handled carefully. Using quality bags helps mitigate this. |
| Airtight Protection: Seals out contaminants and odors from the freezer. | Learning Curve: Some users may need a little practice to get perfect seals, especially with moist or delicate foods. |
| Versatility: Vacuum sealers can be used for many other foods, not just fruits. | Pre-freezing Required: For best texture, pre-freezing is often necessary, adding an extra step. |
Overall, for those who want the best possible quality from their frozen produce and plan to freeze regularly, the pros of vacuum sealing often outweigh the cons.
How to Use Your Frozen Vacuum-Sealed Peaches
One of the best parts about freezing peaches this way is how easy they are to use when you need them! You can:
- Thaw Gently: For most uses, simply remove the bag from the freezer and let it thaw in the refrigerator for several hours, or at room temperature for about an hour.
- Add Directly to Recipes: For baking pies, cobblers, or muffins, you can often add the frozen peach slices directly to your recipe. Baking time might need slight adjustments.
- Smoothies: Frozen peaches are fantastic in smoothies! Just pop them straight from the freezer into your blender.
- Sauces and Compotes: Simmer frozen peaches with a little sugar and spices for a quick sauce.
Because they’ve been vacuum-sealed, you’ll find they rehydrate beautifully and retain much of their fresh-picked flavor, making them a versatile ingredient in your kitchen year-round.
Frequently Asked Questions About Freezing Peaches in Vacuum Bags
Here are some common questions home cooks have when starting with this method:
- Q1: Do I need to peel my peaches before vacuum sealing?
- A1: No, peeling is optional. The skin is edible and dissolves somewhat during cooking or thawing. For certain recipes where you prefer no skin, it’s easier to peel them before freezing. Vacuum sealing will protect them either way.
- Q2: Can I vacuum seal sliced peaches without pre-freezing them?
- A2: You can, but it’s not recommended for maintaining the best texture. Without pre-freezing, the slices will likely stick together in one large clump in the bag, making it harder to separate them later for recipes. Pre-freezing keeps them individual.
- Q3: How long do vacuum-sealed peaches last in the freezer?
- A3: Properly vacuum-sealed peaches can maintain excellent quality for 2 to 3 years. Traditional methods typically offer only 6-12 months before quality significantly degrades due to freezer burn.
- Q4: My vacuum sealer is struggling to seal properly. What can I do?
- A4: Ensure the sealing channel is clean and dry. Any moisture, food particles, or sugar residue can prevent a good seal. You might need to trim the bag slightly or use a paper towel to wipe down the sealing area before re-attempting. For very moist items, consider using the “moist” setting if your machine has one.
- Q5: Can I vacuum seal peaches in syrup or juice?
- A5: Yes, but be careful. If sealing whole bags of peaches in syrup or juice, freeze them in a rigid container first until solid, then vacuum seal. Alternatively, you can place the frozen peaches and their liquid into a vacuum bag, but be aware that excess liquid can interfere with the seal. Some machines have specific settings for liquids.
- Q6: What is the best way to thaw vacuum-sealed peaches?
- A6: For baking or cooking, thawing them directly from frozen is often best. For eating fresh or using in a recipe that requires thawed fruit, the safest and best method is slow thawing in the refrigerator. This preserves texture. You can also thaw them at room temperature for about an hour, but be mindful of food safety guidelines for thawed produce.
Conclusion: Enjoy Your Preserved Peaches All Year!
Freezing peaches in vacuum bags isn’t just a method; it’s a gateway to enjoying the sweet taste of summer whenever you please. By taking a few simple steps, you can protect your precious harvest from freezer burn and significantly extend its life. This technique ensures that when you reach into your freezer months from now, you’ll find peaches that are still vibrant, flavorful, and ready to be transformed into delicious pies, smoothies, or sauces.
Don’t let your perfectly ripe peaches go to waste. With a vacuum sealer and a little preparation, you can easily capture that peak-season flavor and enjoy it throughout the year. It’s a rewarding way to make the most of your produce and bring a taste of sunshine into your kitchen, no matter the season. Happy sealing!

Leave a Reply