
Can You Vacuum Seal And Freeze Peaches: Effortless Storage
Yes, you absolutely can vacuum seal and freeze peaches! This method is a fantastic way to preserve their fresh flavor and texture for months, making them a convenient treat for smoothies, pies, or snacking year-round. It’s a simple process that significantly extends their shelf life compared to traditional freezing methods.
Peaches are a summer delight, bursting with sweet, juicy flavor. But what happens when you have too many to enjoy at once? Letting them go to waste feels like a kitchen crime! Many home cooks worry about freezer burn or mushy fruit ruining their precious peaches. Fortunately, there’s a smarter way to store them so you can savor that deliciousness anytime. Vacuum sealing is a game-changer for preserving fruits like peaches. It removes air, a key culprit behind spoilage and freezer burn. Let’s dive into how you can master this technique and keep your peaches perfect!
Why Vacuum Seal Peaches for Freezing?
Freezing is a great way to extend the life of fruits, but it’s not always perfect. Traditional methods, like placing fruit in freezer bags, often leave pockets of air. This air can lead to:
- Freezer Burn: This happens when ice crystals form on the surface of the food, dehydrating it and causing a dry, leathery texture and off-flavors.
- Oxidation: Exposure to air can cause fruits like peaches to brown and lose their vibrant color and taste.
- Reduced Shelf Life: While frozen, unprotected peaches might still degrade in quality faster than you’d like.
Vacuum sealing directly combats these issues. By removing virtually all the air from the packaging, it:
- Prevents Freezer Burn: With no air to form ice crystals, the peaches stay moist and tender.
- Minimizes Oxidation: Less air means less exposure to the elements that cause browning and flavor degradation.
- Extends Shelf Life Significantly: Vacuum-sealed peaches can retain their quality for up to 2-3 years, compared to about 8-12 months for traditionally frozen peaches.
- Saves Space: Vacuum sealing compresses the food, allowing you to pack more into your freezer efficiently.
Tools You’ll Need
Getting started with vacuum sealing and freezing peaches is straightforward. You likely have most of the necessary items already, with just a couple of specialized tools.
| Tool | Description | Why It’s Important |
| Vacuum Sealer Machine | An appliance that removes air from bags and then seals them with heat. | This is the core tool for the entire process. |
| Vacuum Sealer Bags or Rolls | Specialized plastic bags designed to withstand vacuum pressure and freezing temperatures. Available in pre-cut sizes or rolls you can cut to custom lengths. | Crucial for creating an airtight seal and protecting food. Ensure they are BPA-free and food-safe. |
| Sharp Knife | For preparing the peaches. | A good knife makes dicing and slicing easier and safer. |
| Cutting Board | A stable surface for prepping peaches. | Essential for safe and efficient chopping. |
| Baking Sheet or Tray | A flat surface for flash-freezing peaches before sealing. | Prevents peaches from clumping together. |
| Lemon Juice (Optional) | Freshly squeezed or bottled. | Helps prevent browning of cut peaches. |
| Sugar or Sweetener (Optional) | Granulated sugar, brown sugar, honey, or your preferred sweetener. | Can help preserve texture and add flavor, especially for peaches that will be used in desserts. |
| Freezer | Your standard home freezer. | The destination for your perfectly preserved peaches! |
Step-by-Step Guide: How to Vacuum Seal and Freeze Peaches
Preserving that summer peach goodness is easier than you might think! Follow these simple steps for perfectly vacuum-sealed and frozen peaches.
Step 1: Select and Prepare Your Peaches
Choose Ripe, Firm Peaches: Look for peaches that are fragrant, slightly soft to the touch, but still firm enough to hold their shape. Overripe or bruised peaches won’t hold up well to the freezing process. If you can’t use them immediately, you can ripen them at room temperature.
Wash Thoroughly: Gently wash the peaches under cool running water. Pat them dry with a clean kitchen towel.
Peel (Optional): Some people prefer to peel their peaches. You can easily do this by blanching them. Bring a pot of water to a boil. Score an “X” on the bottom of each peach. Submerge them in boiling water for about 30-60 seconds, then immediately transfer them to an ice bath. The skins should slip off easily.
Pit and Slice/Dice: Cut the peaches in half, twist them apart, and remove the pit. Then, slice or dice the peach halves into your desired serving size. Uniform pieces will freeze more evenly.
Step 2: Treat Cut Peaches to Prevent Browning (Optional but Recommended)
Cut peaches are prone to oxidizing and turning brown, even before freezing. A simple citric acid treatment can prevent this:
- Lemon Juice Bath: Mix 1 tablespoon of lemon juice with 1 tablespoon of sugar (optional) in a bowl. Add about 2 cups of cold water. Stir to dissolve the sugar. Add the sliced peaches and gently toss to coat. Let them soak for about 5-10 minutes.
- Alternative: Ascorbic Acid: You can also use a solution of ascorbic acid (Vitamin C), readily available online or at pharmacies. Follow package directions, typically dissolving a small amount in cold water.
After treatment, drain the peaches and pat them very dry. Moisture is the enemy of good vacuum sealing!
Step 3: Flash Freeze the Peaches
This is a crucial step for preventing your peaches from clumping into one giant frozen mass. It also helps them retain their shape better.
- Arrange the prepared peach slices or dices in a single layer on a baking sheet or tray. Ensure the pieces aren’t touching each other.
- Place the baking sheet in the freezer for 1-2 hours, or until the peaches are firm to the touch.
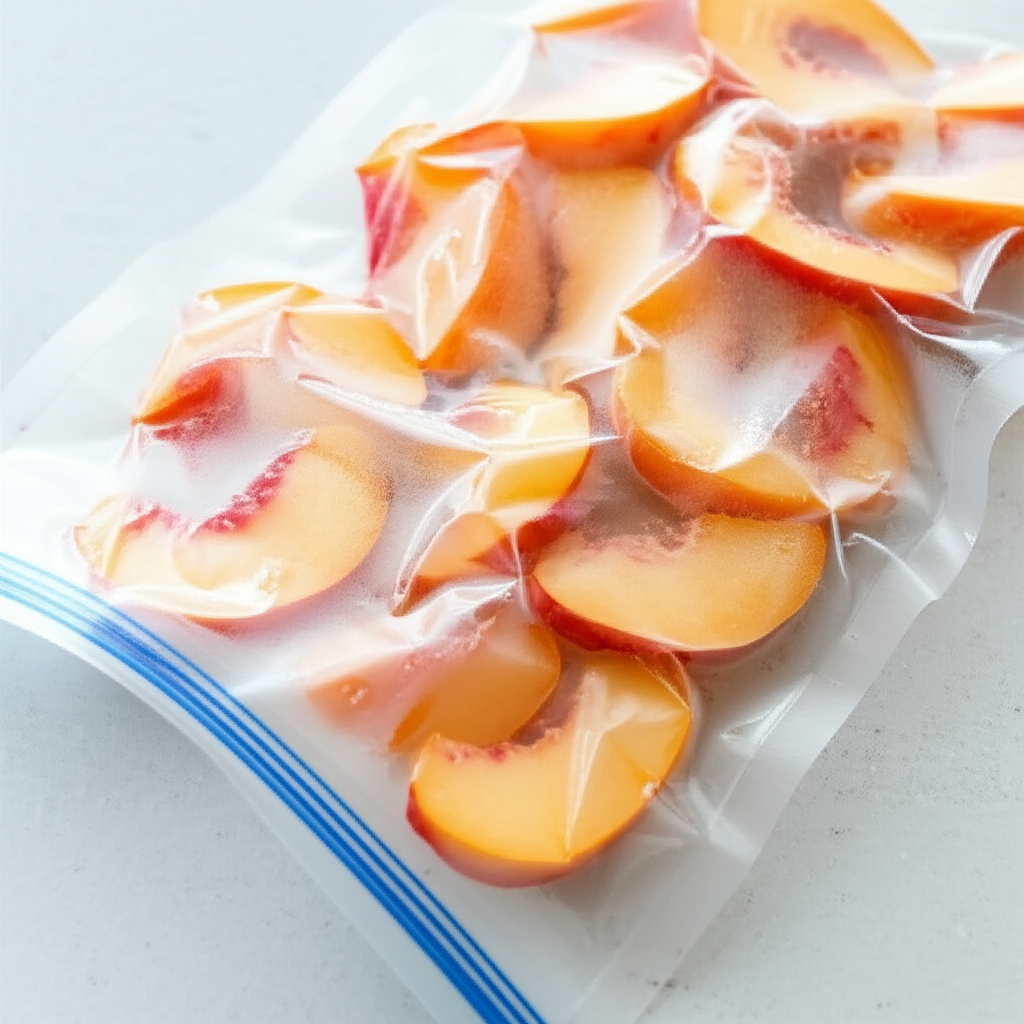
Step 4: Vacuum Seal the Peaches
Once your peaches are solid, it’s time to vacuum seal them.
- Prepare Your Bags: If using vacuum sealer rolls, cut them to the desired length, ensuring there’s enough material for a good seal. Place the peaches into the bag, leaving about 3-4 inches of space at the top for the sealing mechanism.
- Dry the Bag Rim: This is very important! Wipe the inside of the bag’s opening thoroughly with a paper towel to remove any moisture. Dampness can interfere with the seal.
- Seal with Your Machine: Place the open end of the bag into your vacuum sealer according to the manufacturer’s instructions. Select the appropriate setting if your machine has different options (e.g., moist/dry, gentle). Activate the machine to remove the air and create a strong seal.
- Double Check the Seal: Ensure the seal is complete and there are no gaps or wrinkles in the sealed area.
Tip: For very juicy fruits like peaches, some vacuum sealers have a “moist” setting. If yours doesn’t, consider vacuum sealing briefly, then removing the bag and immediately heat-sealing the last inch or so again to ensure an extra-secure seal.
Step 5: Label and Freeze
Proper labeling is key to managing your frozen bounty.
- Use a permanent marker to write the contents (e.g., “Vacuum Sealed Peaches”), the date sealed, and the variety or preparation method (e.g., “sliced, with sugar”).
- Place the sealed peach packages flat in your freezer. Once they are frozen solid, you can stack them to save space if needed.
How Long Do Vacuum Sealed Frozen Peaches Last?
Properly vacuum-sealed and frozen peaches offer impressive longevity. Generally, you can expect:
- Optimal Quality: Up to 2-3 years.
- Safe to Eat: Indefinitely, as long as they remain frozen and the seal is intact.
This is significantly longer than peaches stored in regular freezer bags, which typically maintain good quality for only 8-12 months before freezer burn and quality degradation become noticeable. For best flavor and texture, aim to use them within the 2-3 year window.
Using Your Frozen Peaches
The magic of vacuum-sealed peaches is that they are incredibly versatile and retain much of their fresh quality when thawed. Here are some ideas:
- Smoothies: Drop frozen peach slices directly into your blender for instant, perfectly chilled smoothies.
- Pies and Cobblers: Thaw them slightly for baking. You may need to drain off any excess liquid.
- Sauces and Compotes: Simmer frozen peaches with a little sugar and spices for a delicious topping for pancakes, yogurt, or ice cream.
- Salsas: Thaw and chop for a sweet addition to savory salsas.
- Snacking: Some people enjoy eating them semi-frozen like a sorbet!
Thawing Tip: For baking or cooking, thaw peaches in the refrigerator overnight. If you need them faster, you can speed up thawing in a sealed bag submerged in cold water, or gently heat them in a microwave on a defrost setting.
Pros and Cons of Vacuum Sealing Peaches
Like any food preservation method, vacuum sealing has its advantages and disadvantages.
Pros:
- Superior Preservation: Significantly extends shelf life and maintains quality by preventing freezer burn and oxidation.
- Space Efficiency: Removes air, allowing for tighter packaging and more storage.
- Maintains Texture and Flavor: Peaches retain their fresh-like quality better than with traditional freezing.
- Prevents Moisture Loss: The airtight seal keeps peaches from drying out.
- Versatile Usage: Great for sweet and savory applications after thawing.
Cons:
- Initial Investment: Requires purchasing a vacuum sealer machine and specialized bags.
- Requires Preparation: Steps like blanching, flash freezing, and ensuring a dry seal add to the prep time.
- Not Ideal for All Fruit Textures: While great for peaches, some very delicate berries might require slightly different handling.
- Potential for Mess: Peach juice can sometimes be an issue if bags aren’t sealed perfectly or are overfilled.
Vacuum Sealing vs. Other Freezing Methods
Let’s compare vacuum sealing to other common methods:
| Method | Pros | Cons | Best For |
| Vacuum Sealing | Excellent preservation, space-saving, prevents freezer burn. | Higher initial cost, requires specialized equipment, potential for juice leakage if not careful. | Maximizing shelf life and quality for fruits, vegetables, meats. |
| Freezer Bags (Dry Pack) | Inexpensive, easy to use, minimal equipment. | Prone to freezer burn, air pockets, less space-efficient, shorter optimal quality storage time. | Quick freezing when shelf life is less critical. |
| Freezer Bags (with Water Pack) | Helps prevent freezer burn, good for fruits and vegetables. | Alters texture, changes fruit into a more “syrupy” state, not ideal for all uses. | Fruits intended for smoothies or jams where the syrup is welcome. |
| Freezer Containers | Reusable, stackable, good protection. | Can be bulky, air can still get trapped, not as effective as vacuum sealing against freezer burn. | Soups, stews, larger produce items. |
Frequently Asked Questions (FAQ)
Q1: Can I vacuum seal peaches without peeling them?
A1: Yes, you can vacuum seal peaches without peeling them. However, peeling can result in a smoother texture, especially for baked goods. If you choose not to peel, ensure they are thoroughly washed and dried.
Q2: Do I need to add sugar when vacuum sealing peaches?
A2: Adding sugar is optional and depends on your intended use. Sugar helps preserve texture and flavor, especially for fruits used in desserts. For smoothies or savory dishes, you can omit it entirely. If adding, a dry sugar pack (toss with sugar before flash freezing) or a light syrup pack before sealing works well, but be mindful that added liquid can make sealing trickier. For vacuum sealing, a dry pack is generally preferred.
Q3: My vacuum sealer is struggling to seal the peach bags due to moisture. What can I do?
A3: This is common with juicy fruits! Ensure you’ve thoroughly dried the inside rim of the bag before sealing. If your machine has a “moist” setting, use it. You can also try placing a folded paper towel just inside the bag (not in the sealing area) to absorb excess moisture during the vacuuming process, then remove it and re-seal if necessary, or do a second heat seal on the initial seal.
Q4: Can I freeze whole peaches with a vacuum sealer?
A4: It’s not recommended to vacuum seal whole peaches. They are too bulky, and the skin can puncture the bag. It’s best to prepare them by pitting, slicing, or dicing before vacuum sealing.
Q5: What’s the difference between vacuum sealing and just using a zip-top freezer bag?
A5: The key difference is air. Vacuum sealing removes almost all air, preventing freezer burn and significantly extending shelf life. Zip-top bags leave some air inside, leading to faster quality degradation and potential freezer burn over time.
Q6: How do I thaw vacuum-sealed peaches?
A6: The best way to thaw is in the refrigerator overnight. For faster thawing, you can submerge the sealed bag in a bowl of cold water. Avoid thawing at room temperature for extended periods to prevent bacterial growth.
Conclusion
Vacuum sealing and freezing peaches is an incredibly effective and rewarding way to capture their peak season flavor and enjoy them throughout the year. By following these straightforward steps—from selecting the ripest fruit and preparing it correctly to employing the flash-freeze and a reliable vacuum seal—you’ll be well on your way to a freezer brimming with perfectly preserved peaches. Say goodbye to freezer burn and mushy disappointment, and hello to effortless access to delicious peaches for all your culinary creations. This method not only ensures a longer shelf life but also makes your freezer more organized and your peaches ready for immediate use in smoothies, pies, or a delightful snack. So, go ahead, embrace this simple yet powerful technique and extend the joy of peach season!

Leave a Reply