
Can You Freeze Peaches With Vacuum Sealer: An Easy Method for Extending Summer’s Sweetness
Yes, you absolutely can freeze peaches with a vacuum sealer! This method offers superior protection against freezer burn, preserving the fresh flavor andTexture of your peaches for months to come. It’s a simple, effective way to enjoy summer’s bounty year-round.
Imagine biting into a perfectly ripe peach in the dead of winter. It’s a delightful thought, isn’t it? But the reality of freezing fresh fruit can be disappointing, often resulting in mushy, freezer-burned disappointments. While plastic bags and containers are common, they let in air, which is the enemy of frozen foods. This is where a vacuum sealer shines. It removes almost all the air, creating a tight seal that keeps your peaches tasting like summer long after the season has passed. Don’t let good fruit go to waste; let’s walk through how to perfectly freeze your peaches with a vacuum sealer.
Why Vacuum Sealing is Your Best Friend for Freezing Peaches
Freezing is a fantastic way to preserve food, but oxygen is the primary culprit behind freezer burn. Freezer burn occurs when ice crystals form on the surface of food, dehydrating it and altering its texture and flavor. Traditional methods, like using freezer bags, often leave air pockets, even after you try to squeeze them out. A vacuum sealer removes this air, creating an airtight barrier.
This airtight seal is crucial for peaches because they are high in moisture. When exposed to air and freezing temperatures, the water within the peach can expand and damage the cell structure, leading to a softer, less appealing fruit upon thawing. By vacuum sealing, you minimize this damage, keeping your peaches firmer and more flavorful.
Think of it like this: an astronaut’s suit protects them from the harsh vacuum of space. A vacuum-sealed bag protects your peaches from the harsh “vacuum” of your freezer’s air circulation. This advanced protection means your frozen peaches will be much closer to their fresh state when you’re ready to enjoy them.
The Benefits of Vacuum Sealing Peaches
Beyond just preventing freezer burn, vacuum sealing offers several advantages for fruit preservation:
- Extended Shelf Life: Properly vacuum-sealed and frozen peaches can last for 1-2 years, maintaining good quality.
- Superior Texture Preservation: Less air exposure means less ice crystal formation, leading to a firmer texture upon thawing.
- Maintained Flavor: The airtight seal prevents flavor degradation and the absorption of unwanted freezer odors.
- Space Efficiency: Vacuum-sealed bags are often more compact and stackable than bulky containers or bags.
- Reduced Waste: Preserve those beautiful peaches from the farmer’s market or your own tree, ensuring you get to enjoy them fully.
What You’ll Need: Essential Tools and Ingredients
Before you start, gather everything you need. Having your supplies ready makes the process smooth and efficient.
Key Ingredients:
- Fresh, Ripe Peaches: Choose firm, ripe peaches without bruised spots.
- Citric Acid or Lemon Juice (Optional but Recommended): A small amount helps prevent browning due to oxidation. You can find information on safe food preservation techniques, including the use of acidulants, from resources like the National Center for Home Food Preservation.
Essential Equipment:
- Vacuum Sealer Machine: Any reliable home vacuum sealer will work.
- Vacuum Sealer Bags or Rolls: Ensure they are food-grade and suitable for freezing.
- Baking Sheet or Tray: For pre-freezing.
- Sharp Knife: For cutting and pitting.
- Cutting Board.
- Bowl: For preparing the peaches.
- Measuring Spoons (if using citric acid/lemon juice).
- Freezer-Safe Labels and Marker.
Step-by-Step Guide: Freezing Peaches with a Vacuum Sealer
Follow these easy steps to perfectly freeze your peaches. We’ll cover prepping, pre-freezing, and the final vacuum sealing.
Step 1: Select and Prepare Your Peaches
Start with the best quality fruit. Choose peaches that are ripe but still firm. Overripe or bruised peaches won’t freeze as well and can become mushy.
- Wash: Gently wash the peaches under cool running water.
- Peel (Optional): You can peel peaches by blanching them: score a small ‘X’ on the bottom of each peach, then drop them into boiling water for 30-60 seconds. Immediately transfer them to an ice bath. The skins should then slip off easily. If you prefer leaving the skins on, just ensure they are well-washed.
- Pit and Slice: Cut the peaches in half, twist to separate, and remove the pit. Slice the peaches into uniform pieces, about ½ inch thick. This ensures even freezing and packing.
Step 2: Treat for Browning (Optional but Recommended)
Peaches are prone to browning when exposed to air, even after slicing. A simple acidic solution can prevent this.
- In a large bowl, combine 1 quart (4 cups) of cold water with 1 tablespoon of citric acid or 3 tablespoons of lemon juice.
- Add the peach slices to the solution and soak for 5-10 minutes.
- Drain the peaches thoroughly and pat them dry with paper towels. Gently drying is key to a good vacuum seal.
Step 3: Pre-Freeze the Peaches
This is a critical step for preserving texture. Freezing the slices individually before sealing prevents them from clumping together into a solid block and allows for easier portioning later.
- Line a baking sheet or tray with parchment paper or wax paper.
- Arrange the peach slices in a single layer on the prepared tray, ensuring they don’t touch each other.
- Place the tray in the freezer for 2-4 hours, or until the slices are frozen solid.
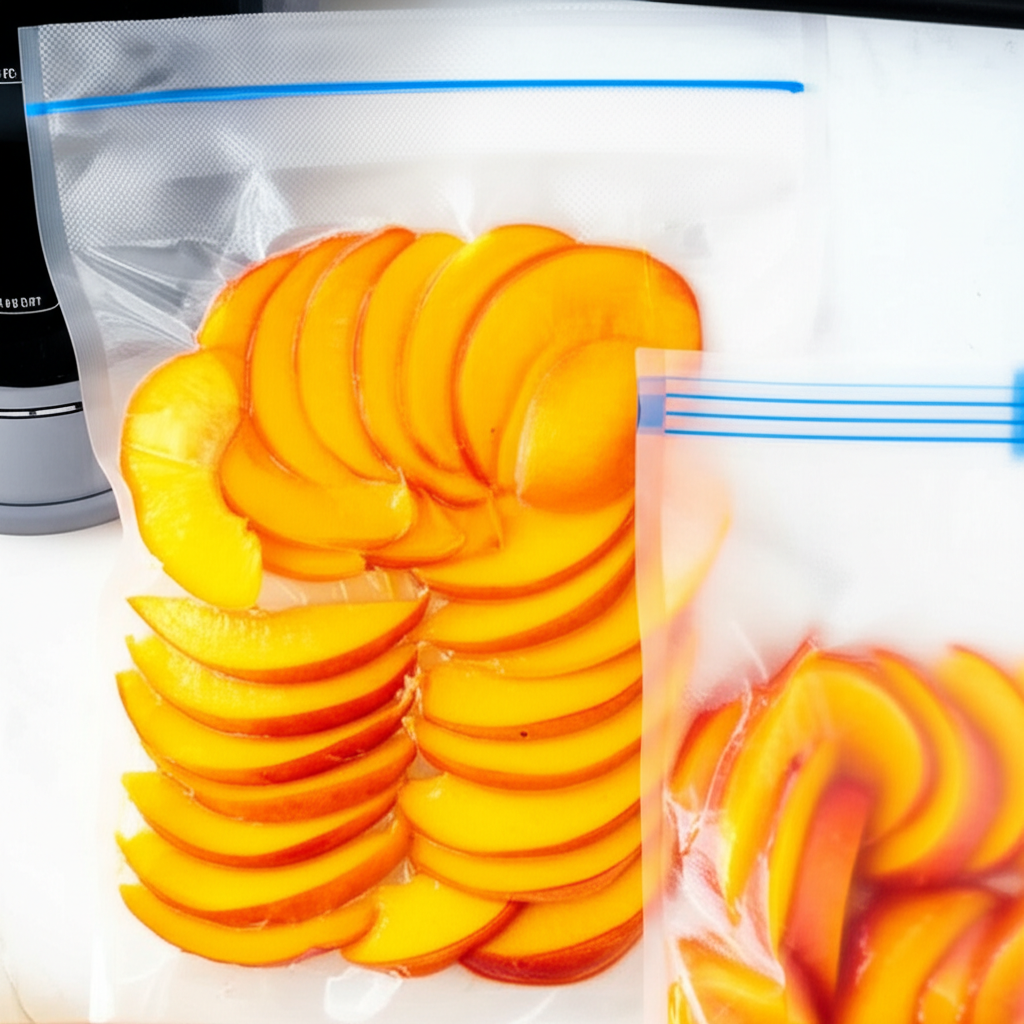
Step 4: Vacuum Seal the Frozen Peaches
Now it’s time for the main event! You’ll be sealing the pre-frozen peach slices.
- Portion: Remove the frozen peach slices from the freezer. Divide them into desired portion sizes. Small batches are easier to thaw for immediate use.
- Bag It: Place a portion of the frozen peach slices into a vacuum sealer bag or a length of vacuum sealer roll. Don’t overfill the bag; leave enough space at the top for the sealing mechanism.
- Seal: Place the open end of the bag onto the vacuum sealer’s sealing strip according to your machine’s instructions. Activate the vacuum and seal function. The machine will remove the air and then create a tight seal.
- Label: Once sealed, immediately label each bag with the contents (“Frozen Peaches”) and the date of freezing.
- Store: Transfer the sealed peach bags to your freezer.
Alternatives to the Standard Seal
Sometimes, moisture from frozen foods can interfere with the vacuum sealer’s ability to create a perfect seal. Here are a few helpful tips:
- Double Sealing: For extra security, especially with very juicy fruits, you can create an additional seal a couple of inches away from the first one.
- Paper Towel Barrier: Place a folded paper towel just inside the sealing area of the bag (making sure it doesn’t get vacuumed out). The paper towel can absorb any excess moisture that might try to escape during the vacuum process. Remove the paper towel before the final seal.
- Pulse Vacuum: If your machine has a “pulse” function, use it to gently remove air without crushing the delicate peach slices.
Thawing Your Vacuum-Sealed Peaches
When you’re ready to enjoy your frozen peaches, thawing them correctly is key to maintaining their quality.
- Refrigerator Thawing: This is the safest and best method for preserving texture. Place the sealed bag in the refrigerator overnight. Once thawed, open the bag and drain any excess liquid.
- Cold Water Thawing: For faster thawing, you can submerge the sealed bag in a bowl of cold water. Change the water every 30 minutes to keep it cold. Do not use hot water, as this can cook the peaches and promote bacterial growth.
- Microwave Thawing (Use with Caution): If you’re in a hurry, you can microwave the peaches on the defrost setting for short intervals. Thaw only what you need immediately, and be aware that this method can make the texture softer.
Once thawed, your peaches are ready to be used in smoothies, pies, crumbles, or simply enjoyed fresh!
Comparing Freezing Methods for Peaches
Let’s look at how vacuum sealing stacks up against more traditional methods.
| Method | Pros | Cons |
|---|---|---|
| Vacuum Sealing | Excellent protection against freezer burn; retains fresh flavor and texture; space-efficient; significantly extends shelf life; reduces waste. | Requires a vacuum sealer machine and specialized bags; initial cost for equipment. |
| Freezer Bags (Manual Air Removal) | Inexpensive and widely available; easy to use. | Less effective at removing air, leading to a higher risk of freezer burn; texture and flavor can degrade faster; bags can become stiff and brittle over time. |
| Airtight Containers | Reusable and durable; good protection if packed tightly; prevents leaks. | Can take up more freezer space; might not remove all air if not packed completely full; can be difficult to stack efficiently. |
As you can see, while other methods have their place, vacuum sealing offers the most comprehensive protection for your precious peaches, ensuring you get the best possible quality when you unfreeze them.
Tips for Perfect Vacuum-Sealed Peaches
Here are a few extra tips from my kitchen to yours:
- Don’t Seal Hot Peaches: Always let your peaches cool down completely before vacuum sealing. Sealing hot or warm food can damage your vacuum sealer.
- Use High-Quality Bags: Investing in good quality, freezer-safe vacuum bags will pay off in the long run with better seals and less risk of leaks.
- Don’t Over-Vacuum Tender Fruit: If your peaches are very soft, some machines have a “gentle” or “moist” setting that can help prevent them from getting crushed during the air removal process.
- Practice Portion Control: Seal peaches in the amounts you’re likely to use at once. It’s far better to thaw a small bag than to thaw a large batch and have to re-freeze the leftovers (which degrades quality).
- Consider Dry-Packing: While we discussed the acid solution for browning, for maximum texture preservation, some people opt for a “dry pack.” This involves skipping the liquid soak entirely and going straight from slicing to pre-freezing to sealing. The downside is slight browning may occur on the surface.
Frequently Asked Questions About Freezing Peaches with a Vacuum Sealer
Q1: Will vacuum sealing stop peaches from getting mushy?
Vacuum sealing significantly reduces mushiness by preventing freezer burn and protecting cell structure from ice crystals. However, peaches are naturally high in moisture, so some softening upon thawing is inevitable compared to fresh peaches. The key is that they will be far less mushy than if frozen using other methods.
Q2: Can I vacuum seal fresh, unpeeled peaches?
Yes, you can vacuum seal fresh, unpeeled peaches. If you choose this method, ensure they are thoroughly washed. Pledging them first can make them easier to handle and remove the pit, but it’s not strictly necessary for sealing.
Q3: My vacuum sealer is struggling to seal due to peach juice. What should I do?
This is common! Try the paper towel trick mentioned earlier where you place a folded paper towel near the seal area to absorb excess moisture. Ensure your peaches are dried very well after any washing or pre-treatment, and that the sealing channel of your machine is clean and dry before sealing.
Q4: How long do vacuum-sealed peaches last in the freezer?
When vacuum-sealed and kept at 0°F (-18°C) or below, peaches can maintain excellent quality for 1-2 years. They may remain safe to eat beyond that, but their optimal flavor and texture will begin to decline.
Q5: Do I need to pre-freeze peaches before vacuum sealing?
Yes, pre-freezing (tray freezing) is highly recommended. It prevents the peach slices from being crushed by the vacuum pressure and stops them from clumping together into one solid mass in the bag. This allows for easier portioning and better texture retention.
Q6: Can I vacuum seal cut-up peaches with the skin on?
Absolutely! As long as the peaches are thoroughly washed, you can cut them into halves, slices, or chunks with the skins on and then proceed with the pre-freezing and vacuum-sealing steps. Some people prefer the texture or look with the skins on.
Conclusion: Enjoying Peaches Year-Round with Confidence
Freezing peaches with a vacuum sealer isn’t just effective; it’s a smart way to capture the peak of summer flavor and enjoy it months down the line. By taking a few simple steps—choosing good fruit, prepping it properly, pre-freezing, and then sealing out the air—you’re setting yourself up for delicious success. No more disappointing freezer-burned fruit!
Whether you’re an avid gardener with a bounty of fruit, a frequent farmer’s market shopper, or just someone who loves peaches, this method will help you make the most of your harvest. So, gather your peaches, fire up your vacuum sealer, and get ready to experience the joy of perfectly preserved peaches that taste almost as fresh as the day you froze them. Happy sealing!

Leave a Reply